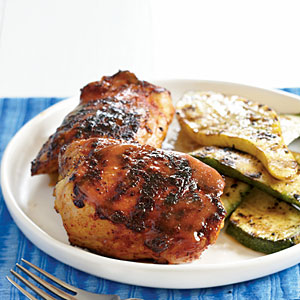
Chipotle-Mango Barbecue Chicken with Cilantro Chimichurri

The heat wave has broken!  Well, for today, anyway.  Our string of 90-degree days has finally come to an end, and we’re enjoying a much more Minnesota-like afternoon in the low 80’s.  During any other summer that’d seem pretty warm, but this year it’s a refreshing break.  Even so, the sun was shining and the lawn was freshly mowed, so it was a perfect day to entertain Jim and Sandra for our monthly dinner.  And how better to celebrate the day?  Bring on some smoke and heat!

The menu today was from a Guy Fieri article in Food Network Magazine entitled “Guy at the Grill”, and right away we knew it would be a winner for a mid-summer cookout.  The bonus for us was that we knew Jim is a huge fan of “Diners, Drive-Ins and Dives”, so this choice was going to be a slam dunk.  We were not disappointed!

The Chipotle-Mango Barbecue sauce for the chicken had a fantastic flavor, and there were so many things going on that we found it to be quite complex.  The mangoes and lemon juice and rice vinegar gave us an initial hit of sweetness with just a bit of tart.  On it’s own this might have quickly become too much, but then the chipotle peppers and adobo sauce took over, and the subtle heat gave it a very welcome balance.  The cilantro and garlic flavors were there as a subtle backdrop, and the net effect of all these flavors on the grilled chicken was terrific.  On alternating bites I spread a little of the chimichurri on the chicken, and was rewarded with a bright burst of contrasting freshness.  This was an entree that had everyone at the table smiling!

Some notes on the preparation:  If I had it to do again (and I probably will), I think I’d go without the skin on the chicken.  This has only a little to do with the health aspects of the dish, and much more to do with the ease of grilling.  I don’t know if it’s just me, but whenever I try to grill skin-on chicken I seem to have a little flame-up problem.  Little, like the cauldron at the London Olympic games.  Does anyone else find this to be an issue?  I think if I were to forgo the skin I might be able to control this little issue and not fear that I’m going to burn down my house.  Also, I found the chimichurri to be a little too “liquidy”, and so I drained off some of the liquid before serving.  I tested the flavors and they didn’t seem to suffer at all.  You may want to watch that.

Overall, this was a terrific meal!  We served it with Guy’s “Smoking Potato Salad” and “Long Beach Coleslaw”, and I’d recommend both of those as well.  It was a terrific day, and a smokey, grilled meal with a bit of peppery heat complemented it perfectly.

Enjoy!

Ingredients:

Chicken:

  • 3 mangoes, peeled, pitted and chopped
  • 1-1/4 cups loosely packed fresh cilantro, not chopped, stems and all
  • 3 chipotle chili peppers in adobo sauce, plus 1 tbsp sauce from the can
  • 3 tbsp rice vinegar (not seasoned)
  • 4 cloves garlic
  • 3 tbsp fresh lemon juice
  • 1-1/2 tbsp canola oil, plus more for the grill
  • Kosher salt and freshly cracked pepper
  • 12 pieces skin-on, bone-in mixed chicken thighs and drumsticks (about 5 pounds)

Chimichurri:

  • 1-1/2 cups fresh cilantro leaves
  • 1/2 cup fresh flat-leaf parsley leaves
  • 2 scallions, white parts only, roughly chopped
  • 3 cloves garlic, minced
  • 1 cup grapeseed oil
  • 1 tsp agave syrup
  • 1/4 cup fresh lime juice
  • Kosher salt and freshly cracked pepper

Preparation:

  1. Prepare the chicken:  Put the mangoes, cilantro, chipotles, adobo sauce, vinegar, garlic, lemon juice, canola oil, 1 tbsp salt and 1 tsp pepper in a food processor and puree until smooth.  Adjust the seasoning to taste.
  2. Toss the chicken with half of the mango mixture in a resealable plastic bag and massage to coat the chicken with the sauce.  Refrigerate at least 6 hours to marinate.
  3. Put the other half of the mango mixture in a small saucepan and simmer over low heat until thick, stirring often, about 15 minutes.  Season with salt. Set some of the simmered mango sauce aside for serving and use the rest for basting.
  4. Preheat grill to medium and brush with canola oil.  Remove the chicken from the marinade, brushing off the excess marinade so it doesn’t burn, and put on the grill.  Grill the chicken, turning, until fully cooked through, about 30 minutes.  Baste with the simmered mango sauce during the last 5 minutes.
  5. Meanwhile, make the chimichurri:  Combine the cilantro, parsley, scallions, garlic, grapeseed oil, agave, lime juice, salt and pepper to taste in a food processor and pulse to roughly chop.  Continue processing until the sauce is finely chopped but not smooth (it shouldn’t be a puree).  Set aside at least 15 minutes before serving.
  6. Transfer the chicken to a platter and serve with the chimichurri and reserved mango sauce.

Chicken, Chorizo and Rosemary Risotto with Roasted Balsamic Baby Tomatoes


Every other month we enjoy stretching our culinary muscles and making dinner for Jim and Sandra.  It’s our time to try new and special recipes that might be a little more challenging – and sometimes exotic – than we might do for our selves.  It’s a lot of fun, and the bonus is that on our off months it’s their turn to cook for us!  We’ve been doing this for a number of years, and we’ve never been disappointed!  This past weekend was no exception.

Our menu for the evening consisted of a savory risotto from Jamie Oliver, with earthy seasonings and a healthy portion of roasted baby tomatoes.  I’ll be honest, I know them as grape tomatoes, but who am I to argue with Jamie Oliver?  It was his recipe, so he made the call.  The rich scent of the tomatoes was intoxicating as they roasted in the oven.

Jamie’s roasting method called for an oven pre-heated to 180 degrees Celcius, so that was our first bit of fun.  Does anyone recall the formula for converting Celcius to Fahrenheit?  That’s right!

Fahrenheit = (Celcius * 9 / 5) + 32     or, conversely     Celcius = (Fahrenheit – 32) * 5 / 9

Extra points for anyone who happened to get that right.  (I did, in case you’re wondering.)  When the math portion of cooking was finished, Jim needed to set the oven for 356 degrees F.  I believe he settled for 350 degrees F, and everything worked out fine.  I give Jim credit for working from a Jamie Oliver recipe anyway, as the terminology is sometimes “challenging” for a U.S. cook:  “put a good lug of olive oil in a sautee pan on the hob”.  We don’t work with lugs and hobs that much in the upper midwest, but life is an adventure!

With the tomatoes roasting, he set aside all of his ingredients and carefully got ready to begin The Big Stir.  This was a wise bit of preparation on his part, because he knew that a) once he started he was going to be committed to stirring that dish constantly for next 20 minutes and b) as predicted, his co-chef abandoned him to go chat with the rest of the girls in the living room!  No matter, he performed like a champ, and the result was a fantastic dinner.

The risotto was served with steamed broccoli and cauliflower and a salad, and the entire dinner ended with a freshly made fruit tart with a dollop of ice cream on top.  (Full disclosure:  Our hostess Sandra did return to prepare the tarts, and they were fantastic!)  In all, it was a fabulous dinner, greatly enjoyed by everyone.

Yum!

Ingredients:

  • Chorizo sausage, thinly sliced
  • 1 free range or organic chicken breast, cut into small pieces
  • Risotto rice – 1/2 cup per person
  • 1 large glass of white wine
  • Olive oil
  • 1 courgette, sliced at an angle
  • Parmesan cheese, finely grated
  • Salt and pepper
  • One handful fresh rosemary stalks
  • Baby tomatoes
  • Balsamic vinegar
  • Good quality organic chicken stock
  • One red onion, finely chopped
  • 2 cloves garlic, sliced
  • Butter

Preparation:

Heat up the oven to 180 C. Wash the baby tomatoes and place them in a roasting dish. Crack fresh salt and black pepper over the top, and pour over a generous serving of good quality olive oil. Add a table spoon of balsamic vinegar, and throw in a sprig of rosemary. Put the tomatoes in the oven when it is up to temperature and cook for twenty minutes.

In the mean time, you can start on the risotto. Put a good lug of olive oil in a sautee pan on the hob, and add your sliced garlic, chopped red onion, and the rest of the rosemary – washed, leaves taken off the stalks and finely chopped. Simmer on the hob for five minutes. Add your sliced chorizo and chicken, and continue to cook for five minutes.

Once the chicken has started to colour and the oils are seeping out of the chorizo, add your rice, frying at a medium temperature for a couple of minutes. Then add the wine, keeping the temperature high enough for the wine to simmer.

Now start adding the chicken stock, a small amount at a time, but keeping the ingredients just covered beneath the stock. You’ll need to cook the rice for about fifteen – twenty minutes. After ten minutes, add the sliced courgette, pushing it into the risotto to ensure it cooks through. At this point, your tomatoes should be done. Take them out of the oven and leave to one side.

When your rice is cooked, it’s important to leave your risotto to rest. Add a knob of butter, and pour in the roasted baby tomatoes, together with the yummy balsamic juice that will be in the pan. Add the grated parmesan, and stir these ingredients through the risotto gently. Cover and leave to rest for a couple of minutes (five).

Roasted Chicken with Root Vegetables

Roasted Chicken with Root Vegetables

It all started with a trip to Haskell’s Wine & Spirits in Burnsville. I needed to buy a corkscrew for a gift, but I felt a little guilty for not buying a bottle of wine. My thinking is that if you want to have local wine shops you need to buy wine from local wine shops, so I started browsing and chose an unassuming little Cotes-du-Rhone. For whatever reason that made think of roasted chicken, and off we went! It’s amazing how many resources you can find online for roasted chicken, and I can’t imagine you’d go wrong with any of them. After quite a bit of really fun research, I centered on recipes by Thomas Keller, the chef from The French Laundry in Napa Valley. I found a post on Adam Keller’s “The Amateur Gourmet” blog which detailed his experiences, and that’s the recipe upon which I based my meal.

Some interesting tips that I learned, but didn’t quite have time to implement:

  • Let the chicken stand, uncovered, in the refrigerator for up to two days. This lets the bird dry out sufficiently to give you a nice crispy skin.
  • Let the bird stand on the counter for around two hours prior to cooking. This will allow it to come to room temperature and give you more even roasting.

I did let the bird come to room temp, but I found out about the drying time too late to give it a try this time. I’ll definitely give that a go next time so that I can find out how it works. I also bought bone-in skin-on thighs and drumsticks for my roasting, rather than trussing a whole bird. We like the rich flavor of the dark meat, so this is what we’d normally do. I’ve roasted an intact bird in the past and enjoyed it greatly, but if I’m not planning to make a grand presentation then this is my preferred method.

This was a simple recipe, but I really don’t see any need to make it complicated. The pieces are so succulent and juicy, and they paired perfectly with the Cotes-du-Rhone which inspired the whole meal. Cath and I oohed and ahhed our way through the meal, and our girls seemed quite pleased as well. Another bonus: we found out we enjoyed rutabagas! I’ve had them before in pasties in the Upper Penninsula of Michigan, but this was possibly the first time we’ve made them in our kitchen. They tasted great, and I’m sure we’ll find a way to work them into our cuisine on a regular basis.

Ingredients

  • 8 bone-in skin-on chicken thighs
  • 4 bone-in skin-on chicken drumsticks
  • Kosher salt and freshly ground black pepper
  • 6 garlic cloves, smashed, peeled and chopped
  • 6 thyme sprigs
  • 1 large rutabagas
  • 4 medium carrots, peeled, trimmed, and cut in half
  • 1 small yellow onion, cut into quarters
  • 8 small red-skinned potatoes
  • 1/3 cup olive oil
  • 4 tablespoons (2 ounces) unsalted butter, at room temperature

Preparation

Remove the chicken from the refrigerator and let stand at room temperature for 1 1/2 to 2 hours, or until it comes to room temperature.

Preheat the oven to 475 F.

Generously season the chicken with salt and pepper.

Cut off both ends of the rutabagas. Using a vegetable peeler, peel away the skin, working from top to bottom and removing any tough outer layers. Cut into 3/4-inch pieces. Peel carrots, and cut into two-inch pieces. Cut red potatoes into chunks about 1-1/2 to 2 inches.

Combine all the vegetables and the roughly chopped garlic cloves and thyme sprig in a large bowl. Toss with 1/4 cup of the oil and season with salt and pepper. Spread the vegetables in a large cast-iron skillet or a roasting pan.

Rub the remaining oil over the chicken. Season generously with salt and pepper.

Layer the vegetables evenly on the bottom of the roasting pan, and then layer the ckicken on top.

Cut the butter into small pieces and place one on each piece of chicken.

Place the chicken in the oven and roast for 25 minutes. Reduce the heat to 400 F and roast for an additional 45 minutes, or until the temperature registers 160 F in the meatiest portions of the bird and the juices run clear. If necessary, return the bird to the oven for more roasting; check it every 5 minutes.

Transfer the chicken to a carving board, cover with foil and let rest for 10 minutes.

Just before serving, set the pan of vegetables over medium heat and reheat the vegetables, turning them and glaazing them with the pan juices.

Arrange the pieces of chicken on a serving platter along with the vegetables and serve.

Chicken, Red Grape and Pesto Pizza

Chicken Red Grape and Pesto Pizza

Grapes and pesto on a pizza?  We’ve enjoyed some interesting flavors on our pizzas over the years, but I’m not sure that red grapes and pesto were ever among the choices.  Maybe that’s why we thought we had to give this recipe a try when we found it in the September 2009 issue of Cooking Light Magazine.  I’m very happy we did.

This pizza was an excellent example of how the flavors of certain foods mellow and change as they are roasted in a 475 degree oven.  As we assembled the ingredients, the scent of the thinly sliced oregano and the roasted chicken were nearly overwhelming, and we wondered how this was going to play out in the finished product.  Not to worry!  After only twelve minutes in the hot stove, the garlic was mellow and earthy and delicious.  The grapes took on an incredible savoriness, and their flavor married incredibly with the now warmed pesto.

One note, the recipe calls for refrigerated thin-crust pizza dough, but anyone who knows me knows that I always make my own pizza crusts.  In this case I used the “Olive Oil Dough” recipe from “Artisan Bread in Five Minutes A Day“, by Jeff Hertzberg and Zoe Francois.  I use 1/4 of the dough from a batch of their standard recipe, and then bake the pizza for 12 minutes at 475 degrees on a baking stone.  The flavor is incredible, and it’s well worth the extra effort.

This was a fantastic pizza, perhaps one of my new favorites.  I didn’t actually try the wine suggestion from the magazine, but I have to think that a crisp sauvignon blanc would be a wonderful complement.  I recommend you give this pizza a try when you’re feeling just a little adventurous.  I’m sure you’ll be surprised and pleased!

Ingredients:

  • 1 (11-ounce) can refrigerated thin-crust pizza dough
  • Cooking spray
  • 1/3 cup refrigerated pesto
  • 1 1/2 cups seedless red grapes, halved
  • 8 ounces shredded skinless, boneless rotisserie chicken breast
  • 3 garlic cloves, thinly sliced
  • 4 ounces fresh mozzarella cheese, thinly sliced
  • 3 tablespoons grated Romano cheese
  • 1/4 teaspoon black pepper
  • 1/4 cup sliced green onions

Preparation:

  1. Preheat oven to 425°.
  2. On a lightly floured surface, pat dough into a 12-inch circle; gently place dough on a pizza pan coated with cooking spray. Spread pesto evenly over dough, leaving a 1/2-inch border around edges. Arrange grapes evenly over dough; top evenly with chicken. Top with garlic and mozzarella; sprinkle with Romano and pepper. Bake at 425° for 20 minutes or until crust is golden brown. Sprinkle with onions. Cut into 12 wedges.

Barbecue Chicken with Mustard Glaze

Barbecue Chicken with Mustard Glaze

Mmmm, talk about the savory tastes of summer!  I arrived home from work to a house scented with pungent mustard and chipotle chili powder.  I was famished after a day away, and this was nearly enough to put me over the edge!  We’ve long been fans of the rich flavor of grilled chicken thighs, but the seasonings of this rub combined with the tangy sauce made for a little bit of heaven on a summer evening.

For our tastes, we like to substitute chipotle chili powder whenever a recipe calls for regular chili powder, using 1/2 of the listed amount.  In this case we used 1 teaspoon of the chipotle version, and the added flavor kick was fantastic.  We also opted to grill the chicken thighs on our gas grill, rather than using the grill pan listed here. 

As a side  dish we prepared the summer squash described with the recipe, and our girls oohed and ahhed all the way through dinner.  This recipe, which we found in the July 2009 issue of Cooking Light magazine, went straight to our “keepers” file!  You might want to give it a try.

“A five-ingredient rub and a three-ingredient basting sauce are all you need to take chicken from routine to off-the-charts good. An assortment of spices mixed with common condiments makes a thick, tangy-sweet glaze with a hint of smokiness. Grilled summer squash makes a light, fresh side.”

Ingredients:

  • 2  tablespoons  dark brown sugar
  • 2  teaspoons  garlic powder
  • 2  teaspoons  chili powder
  • 1  teaspoon  smoked paprika
  • 1/2  teaspoon  salt
  • 1/4  cup  ketchup
  • 1  tablespoon  dark brown sugar
  • 1  tablespoon  sherry or red wine vinegar
  • 1  tablespoon  Dijon mustard
  • 8  (6-ounce) skinless, bone-in chicken thighs
  • Cooking spray

Preparation:

1. Combine first 5 ingredients in a small bowl. Combine ketchup and next 3 ingredients (through mustard) in a small bowl; stir with a whisk.

2. Heat a large grill pan over medium-high heat. Rub spice mixture evenly over chicken thighs. Coat pan with cooking spray. Add chicken to pan; cook 12 minutes. Turn chicken over. Brush with half of ketchup mixture; cook 12 minutes. Turn chicken over. Brush with remaining ketchup mixture; cook 2 minutes or until a thermometer registers 165°.

Grilled summer squash: Cut 2 zucchini and 1 yellow squash lengthwise into 1/4-inch-thick slices. Brush with 2 teaspoons olive oil; sprinkle with 1/4 teaspoon salt and 1/8 teaspoon freshly ground black pepper. Grill 3 minutes on each side or until tender.

Chicken Breasts Stuffed with Zucchini and Goat Cheese

chicken-breasts-stuffed-with-zucchini-and-goat-cheese

The late summer feel of zucchini combined with the rich flavor of goat cheese were a great match for a bone-in breast of chicken and a coating of Herbs de Provence. This recipe was another winner from “A Harvest of Pumpkins and Squash” by Lou Seibert Pappas. We paired this chicken with an easy rice pilaf and a delicious Hogue Riesling, and we likened it to an upscale bit of comfort food on a cold, January evening here in Minnesota.

Ingredients:

  • 1 lb zucchini
  • Kosher salt
  • 2 tbsp extra-virgin olive oil, plus extra for brushing
  • 1 medium onion, finely chopped
  • 4 oz goat cheese, at room temperature
  • 3 tbsp unsalted butter, at room temperature
  • 1 large egg
  • 2 tbsp minced, flat-leaf  (Italian) parsley
  • 1/3 cup freshly grated Parmesan cheese
  • 4 bone-in, skin-on chicken breast halves (about 12 oz each)
  • Herbes de Provence for sprinkling

Preparation:

Preheat oven to 375 degrees F.

Shred the zucchini, sprinkle with salt, wrap in paper towels, and let stand for 15 minutes.  Squeeze the zucchini dry.  In a  large skillet, heat the remaining 1 tbsp oil, add the onion, and saute until translucent, about 5 minutes; remove from the heat and let cool.

In a small bowl, beat together the goat cheese and butter until blended.  Add the egg and beat until smooth.  Mix in the zucchini, onion, parsley and cheese.

Using your fingers, loosen the skin from the chicken breasts, leaving one side attached, and force the zucchini stuffing underneath the skin of each breast.  Brush each stuffed breast with olive oil and sprinkle lightly with the herbes de Provence.

Place the chicken in a roasting pan and bake for 25 to 30 minutes.  Serve at once.

NOTE:  The recipe in the book also offers a griling option, but at the moment we have a sheet of ice on the grill, so we’re in no hurry to get it going.  Roasting in the oven worked very well.  We made sure not to call it finished until the skin had turned crispy, with a golden brown color.  The meat was tender and juicy, while the skin was crispy and the stuffing delicious.

Buttermilk Oven-Fried Chicken

buttermilk-oven-fried-chicken

A no-skin, crunchy oven-fried chicken with plenty of flavor.  That’s what I’d been craving for quite some time, and that’s exactly what this recipe delivered.  The girls and I love fried chicken, but the grease and salt of takeout and storebought oven-fried have always left us questioning our judgement afterward.  Luckily, Cooking Light magazine came through for us once again with their 2009 Jan/Feb issue in a terrific article entitled “Weeknight Meal Makeovers”.  It tells how to replace take-out and fast food with healthful, flavorful homemade versions.  I’m sure we’ll try them all, but we needed to start with the chicken.

We’ve tried oven-fried before, but several aspects of this recipe definitely lifted it above the rest.  First was dipping the chicken in buttermilk before dredging.  I love the tang of buttermilk, and I think it contributed greatly to the flavor.  Another plus was the use of cracker meal in the flour to give the resulting crust a good crunch.  If you don’t get the crunch, you’ll never convince yourself it’s fried chicken, oven-fried or otherwise.  Finally, browning the chicken first gave it that golden brown color that it really needed.

It was an easy recipe, and we really enjoyed the result.  The only thing we’ll probably do differently in the future will be to use a package of thighs and drumsticks, rather than a cut-up fryer.  We found the dark meat to be the most juicy and flavorful, and the ratio of meat to crunchy crust was better than with the breast portions.

Ingredients:

  • 1 cup low-fat buttermilk
  • 1 cut up whole fryer chicken, skin removed
  • 1/2 cup all-purpose flour
  • 1/2 cup cracker meal
  • 2/3 tsp kosher salt
  • 1/2 tsp freshly ground black pepper
  • 2 tbsp butter

Preparation:

Preheat oven to 425 degrees F.

Combine buttermilk and chicken in a shallow dish, turning to coat.

Combine flour and cracker meal in a shallow dish.  Transfer chicken from buttermilk to work surface.  Sprinkle chicken evenly with salt and pepper.  Working with one piece at a time, dredge chicken in flour mixture, shaking off excess; set aside.  Repeat procedure with remaining chicken and flour mixture.

Melt butter in large ovenproof non-stick skillet over medium-high heat.  Add chicken to pan, meat side down; cook 4 minutes or until golden brown.  Turn chicken over, and bake at 425 degrees F for 32 minutes, or until juices run clear when chicken is pierced.

Rosemary Grilled Chicken with Mushroom Sauce

rosemary-grilled-chicken-with-mushroom-sauce

Earthy, satisfying, complex.  Sounds like a great glass of wine, but tonight it was our entire meal.  This beauty was from the September 2007 issue of Food & Wine magazine, and it was outstanding.  I’d read this issue a while back and then filed it away, but for some reason it came out over the Christmas break.  It’s Italian food and Italian wine from cover to cover, and that’s something Cath and I can’t resist.  We happened to have some chicken thighs and drumsticks we needed to use, and this recipe was perfect.  The only ingredient we needed to pick up was sliced portobella mushrooms, and we were off and running.  The directions call for grilling boneless, skinless breasts, but I haven’t had the heart to fire up the grill in this cold Minnesota winter so we browned them in a pan on the stove instead.  The result was wonderful, especially when paired with a Mark West Pinot Noir.  From the photo it looks like the classic (small) restaurant portion, but I guarantee it was completely satisfying.  The flavors of the mushrooms and tomatoes complemented the rosemary infused chicken, and the wine was an excellent match.  If you want to experience an Italian delight on a cold winter night, I highly recommend this meal.

Ingredients:

  • 4 skinless, boneless chicken breast halves (1-1/4 pounds) (we substituted one thigh and one drumstick per serving)
  • 5 tbsp extra-virgin olive oil
  • 1 tbsp chopped fresh rosemary
  • freshly ground black pepper
  • 1 pound sliced portobella mushrooms
  • 1 small onion, finely chopped
  • 2 garlic cloves, minced
  • 1 tsp fresh thyme, chopped
  • 3 medium tomatoes – seeded and cut into 1/2 inch dice (we substituted one 14.5 oz. can of stewed tomatoes)
  • kosher salt

Preparation:

Light a grill, or preheat a grill pan.  In a medium baking dish, brush the chicken breasts with 1 tablespoon of the oil, and rub with the rosemary.  Season with pepper, and let stand for 30 minutes.

Meanwhile, heat the remaining 1/4 cup of oil in a large skillet.  Add the mushrooms and cook over moderately high heat until browned, about 6 minutes.  Add the onion, garlic and thyme and cook until the onion is translucent, about 4 minutes.  Add the tomatoes and season with salt and pepper.  Cover partially and cook over low heat, stirring occasionally, until the mushrooms are tender, about 15 minutes.

Season the chicken with salt and grill over moderately high heat, turning once, until cooked through, about 8 minutes.

Season the mushroom sauce with salt and pepper and spoon onto plates.  Slice the grilled chicken breasts on the diagonal 1/2 inch thick.  Arrange the chicken over the mushroom sauce and serve.

4 servings. 

One serving:  383 cal, 21 g fat (3.4 g sat. fat), 14 g carb, 2.1 g fiber

Roast Peppered Cornish Hens

roast-peppered-cornish-hens

This was probably the best Cornish Game Hen recipe we’ve done, which is no knock on these little birds, but rather a commentary on our skills.  This particular recipe was simple, but very flavorful.  The combination of the red currant jelly and the brown mustard made for a rich and complex flavor, with a welcome complement in the underlying layer of kosher salt and freshly ground pepper.  We enjoyed this with steamed green beans and a rice pilaf, and it was perfect for a wintery Friday evening.  We weren’t completely sure what wine was going to be right for this dish, but we decided on a light, crisp Hogue Riesling, and we were very pleased.

Ingredients:

  • 3  (1 1/4-pound) Cornish hens, trimmed and skinned
  • Cooking spray
  • 1/4  cup  spicy brown mustard
  • 1/4  cup  currant jelly
  • 1 1/2  teaspoons  fresh coarsely ground black pepper
  • 1/2  teaspoon  kosher salt

Preparation:

1. Preheat oven to 400°.

2. Remove and discard giblets and necks from hens. Split hens in half lengthwise. Place hen halves, breast sides up, in a roasting pan coated with cooking spray.

3. Combine mustard and jelly. Brush mustard mixture over hens; sprinkle evenly with pepper and salt. Bake at 400° for 30 minutes or until a thermometer inserted in the meaty part of thighs registers 165°. Let stand 10 minutes.

Yield:  6 servings (serving size: 1/2 hen)

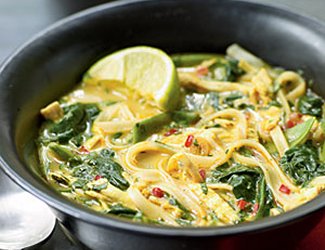
Coconut-Curry Chicken Soup

coconut-curry-chicken-soup

This terrific soup was created by Tina Washburn, a personal chef from San Diego, and featured in the December 2008 edition of Cooking Light magazine. Our Minnesota night was a balmy 14 degrees, and we found the heat and flavor of this creation to be exactly what we needed. We enjoyed this soup with a crusty nine grain bread from a local bakery, and it was just the ticket to keep us warm and happy. Way to go, Tina!

Ingredients:

  • 4 cups water
  • 3 cups fresh spinach leaves
  • 1/2 pound snow peas, trimmed and cut in half crosswise
  • 1 (5 3/4-ounce) package pad thai noodles (wide rice stick noodles)
  • 1 tablespoon canola oil
  • 1/4 cup thinly sliced shallots
  • 2 teaspoons red curry paste
  • 1 1/2 teaspoons curry powder
  • 1/2 teaspoon ground turmeric
  • 1/2 teaspoon ground coriander
  • 2 garlic cloves, minced
  • 6 cups fat-free, less-sodium chicken broth
  • 1 (13.5-ounce) can light coconut milk
  • 2 1/2 cups shredded cooked chicken breast (about 1 pound)
  • 1/2 cup chopped green onions
  • 2 tablespoons sugar
  • 2 tablespoons fish sauce
  • 1/2 cup chopped fresh cilantro
  • 4 small hot red chiles, seeded and chopped, or 1/4 teaspoon crushed red pepper
  • 7 lime wedges

Preparation:

1. Bring 4 cups water to a boil in a large saucepan. Add spinach and peas to pan; cook for 30 seconds. Remove vegetables from pan with a slotted spoon; place in a large bowl. Add noodles to pan; cook 3 minutes. Drain; add noodles to spinach mixture in bowl.

2. Heat canola oil in pan over medium-high heat. Add shallots and the next 5 ingredients (through garlic) to pan; sauté 1 minute, stirring constantly. Add chicken broth to pan, and bring to a boil. Add coconut milk to pan; reduce heat, and simmer 5 minutes. Add chicken, onions, sugar, and fish sauce to pan; cook for 2 minutes. Pour chicken mixture over noodle mixture in bowl. Stir in cilantro and chiles. Serve with lime wedges.